
In this article, we will understand what are the types of spring bean scopes with proper examples.
Bean scope refers to the lifecycle of a bean. Bean scope determines the following
- How many instances of the bean will be created?
- How long the bean will live?
- How the bean will be shared in the spring environment?
Table of contents
Types of spring bean scopes
There are 4 types of scopes in spring beans:
- Singleton bean scope
- Prototype bean scope
- Request bean scope
- Session bean scope
Singleton bean scope
This is the default scope of a spring bean. We don’t have to explicitly give the scope while creating a bean. It will be singleton by default.
Singleton means the spring container will create only one instance of the bean. The same instance will be shared across the whole application.
XML configuration to define singleton bean scope
<beans xmlns="http://www.springframework.org/schema/beans"
    xmlns:xsi="http://www.w3.org/2001/XMLSchema-instance"
    xmlns:context="http://www.springframework.org/schema/context"
    xsi:schemaLocation="http://www.springframework.org/schema/beans
    http://www.springframework.org/schema/beans/spring-beans.xsd
    http://www.springframework.org/schema/context
    http://www.springframework.org/schema/context/spring-context.xsd">

    <!-- Define your beans here -->
    <bean id="employee" class="com.getinputs.Manager"></bean>
</beans>
In the above code, we have not given the scope hence it is a singleton. We can explicitly define the scope as well.
<?xml version="1.0" encoding="UTF-8"?>
<beans xmlns="http://www.springframework.org/schema/beans"
    xmlns:xsi="http://www.w3.org/2001/XMLSchema-instance"
    xmlns:context="http://www.springframework.org/schema/context"
    xsi:schemaLocation="http://www.springframework.org/schema/beans
    http://www.springframework.org/schema/beans/spring-beans.xsd
    http://www.springframework.org/schema/context
    http://www.springframework.org/schema/context/spring-context.xsd">

    <!-- Define your beans here -->
    <bean id="employee" scope="singleton" class="com.getinputs.Manager"></bean>
</beans>
As the scope is a singleton so we will get the same instance of the Manager class whenever we want to use it.
package com.getinputs;

import org.springframework.context.support.ClassPathXmlApplicationContext;

public class SpringDemoApp {
  public static void main(String[] args) {

    ClassPathXmlApplicationContext context = new ClassPathXmlApplicationContext("applicationContext.xml");

    Employee employee1 = context.getBean("employee", Employee.class);
    System.out.println("Employee instance 1 : " + employee1);

    Employee employee2 = context.getBean("employee", Employee.class);
    System.out.println("Employee instance 2 : " + employee2);

    context.close();
  }
}

Output:
Employee instance 1: com.getinputs.Manager @7d0587f1
Employee instance 2: com.getinputs.Manager @7d0587f1
Annotation configuration to define singleton bean scope
@Scope annotation is used to define the scope
package com.getinputs;

import org.springframework.context.annotation.Bean;
import org.springframework.context.annotation.Scope;

public class BeanConfigs {

  @Bean
  @Scope("singleton")
  public Manager manager() {
    return new Manager();
  }
}
We can also use ConfigurableBeanFactory to define a scope
package com.getinputs;

import org.springframework.beans.factory.config.ConfigurableBeanFactory;
import org.springframework.context.annotation.Bean;
import org.springframework.context.annotation.Scope;

public class BeanConfigs {

  @Bean
  @Scope(value = ConfigurableBeanFactory.SCOPE_SINGLETON)
  public Manager manager() {
    return new Manager();
  }
}
Repository link
https://github.com/getinputs/samples/tree/main/singletonscopebean
Prototype bean scope
Spring container will create multiple instances of the same bean for each container request. We have to explicitly define the prototype scope.
XML configuration to define prototype bean scope
<?xml version="1.0" encoding="UTF-8"?>
<beans xmlns="http://www.springframework.org/schema/beans"
    xmlns:xsi="http://www.w3.org/2001/XMLSchema-instance"
    xmlns:context="http://www.springframework.org/schema/context"
    xsi:schemaLocation="http://www.springframework.org/schema/beans
    http://www.springframework.org/schema/beans/spring-beans.xsd
    http://www.springframework.org/schema/context
    http://www.springframework.org/schema/context/spring-context.xsd">

    <!-- Define your beans here -->
    <bean id="employee" scope="prototype" class="com.getinputs.Manager"></bean>
</beans>
As the scope is a prototype so we will get different instances of the Manager class.
package com.getinputs;

import org.springframework.context.support.ClassPathXmlApplicationContext;

public class SpringDemoApp {
  public static void main(String[] args) {

    ClassPathXmlApplicationContext context = new ClassPathXmlApplicationContext("applicationContext.xml");

    Employee employee1 = context.getBean("employee", Employee.class);
    System.out.println("Employee instance 1 : " + employee1);

    Employee employee2 = context.getBean("employee", Employee.class);
    System.out.println("Employee instance 2 : " + employee2);

    context.close();
  }
}

Output:
Employee instance 1: com.getinputs.Manager @7494e528
Employee instance 2: com.getinputs.Manager @4bbfb90a
Annotation configuration to define prototype bean scope
package com.getinputs;

import org.springframework.context.annotation.Bean;
import org.springframework.context.annotation.Scope;

public class BeanConfigs {

  @Bean
  @Scope("prototype")
  public Manager manager() {
    return new Manager();
  }
}
package com.getinputs;

import org.springframework.beans.factory.config.ConfigurableBeanFactory;
import org.springframework.context.annotation.Bean;
import org.springframework.context.annotation.Scope;

public class BeanConfigs {

  @Bean
  @Scope(value = ConfigurableBeanFactory.SCOPE_PROTOTYPE)
  public Manager manager() {
    return new Manager();
  }
}
Repository link
https://github.com/getinputs/samples/tree/main/prototypescopebean
Request bean scope
Request scope beans will be used in the web applications. Spring container will create a new instance of spring bean for each new HTTP request. If a server receives 10 HTTP requests then the spring container will create 10 new instances of the request scope bean.
@RequestScope annotation will be used to define the request scope bean
package com.getinputs;

import org.springframework.stereotype.Component;
import org.springframework.web.context.annotation.RequestScope;

@Component
@RequestScope
public class RequestScopeBean {
}
In the above sample code, a new instance of the RequestScopeBean class will be created for every new HTTP request.
Say we have an application that needs a user login. So we will create a User bean to capture the user login details. As an application will have multiple users so it is not preferable to use a singleton User bean for multiple users. So we can use a Request scope User bean here to capture the user login details. Hence whenever a new user tries to log in a new instance of User bean will get created with that user-specific data.
@Component
@RequestScope
public class User {
  private String userName;
  private String password;
}
Whenever an HTTP request for a user comes, spring internally creates a new User object.
User user = new User();
user.setUserName("Suraj");
user.setPassword("Password1");
Session bean scope
Session scope beans will be used in the web applications. For each new Http session spring container will create a new instance of the spring bean.
@SessionScope annotation will be used to define the session scope bean.
package com.getinputs;

import org.springframework.stereotype.Component;
import org.springframework.web.context.annotation.SessionScope;

@Component
@SessionScope
public class SessionScopeBean {
}
In the above code, a new instance of SessionScopeBean will be created with every new HTTP session.
Say we have a Resource bean and a user has to access this resource. In this case, we do not have to create a new instance of resource bean for each new HTTP request because the resource is the entity that a user requires for the whole session and the resource of the user will not change.
Ex. Facebook profile is the resource object, so a user will have only a single profile hence the application will create only a single profile instance for a user per session.
Example for Request and Session bean scope
To understand the Request and Session bean scope in a better way we will create a Spring Web MVC example.
In this example, we will create a counter variable in a request scope bean and a session scope bean. We will check how the counter increments in both of these beans.
Project structure
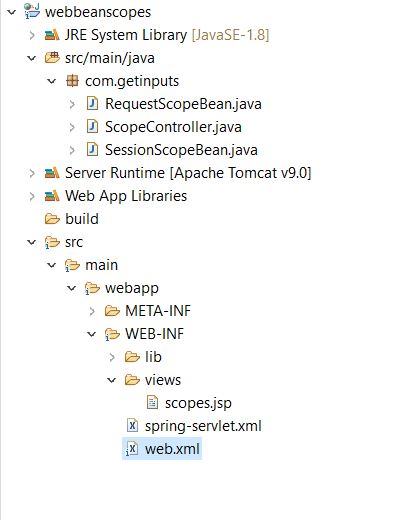
Deployment descriptor file: web.xml
Here we define the servlet mappings and the front controller for the spring MVC application.
<?xml version="1.0" encoding="UTF-8"?>
<web-app
	xmlns:xsi="https://www.w3.org/2001/XMLSchema-instance"
	xmlns="https://java.sun.com/xml/ns/javaee" xsi:schemaLocation="https://java.sun.com/xml/ns/javaee https://java.sun.com/xml/ns/javaee/web-app_3_0.xsd" id="WebApp_ID" version="3.0">
	<display-name>spring-mvc-example</display-name>
	<absolute-ordering/>
	<!-- Add Spring MVC DispatcherServlet as front controller -->
	<servlet>
		<servlet-name>spring</servlet-name>
		<servlet-class>
                org.springframework.web.servlet.DispatcherServlet
        </servlet-class>
		<init-param>
			<param-name>contextConfigLocation</param-name>
			<param-value>/WEB-INF/spring-servlet.xml</param-value>
		</init-param>
		<load-on-startup>1</load-on-startup>
	</servlet>
	<servlet-mapping>
		<servlet-name>spring</servlet-name>
		<url-pattern>/</url-pattern>
	</servlet-mapping>
</web-app>
spring-servlet.xml
- Here we define the base package so that the container knows in which package to look to create the spring beans.
- We also add support for conversion, formatting, and validation support.
- we define Spring MVC view resolver ( location of our views or JSP pages )
<?xml version="1.0" encoding="UTF-8"?>
<beans
	xmlns="http://www.springframework.org/schema/beans"
	xmlns:xsi="http://www.w3.org/2001/XMLSchema-instance"
	xmlns:context="http://www.springframework.org/schema/context"
	xmlns:mvc="http://www.springframework.org/schema/mvc"
	xsi:schemaLocation="
		http://www.springframework.org/schema/beans
    	http://www.springframework.org/schema/beans/spring-beans.xsd
    	http://www.springframework.org/schema/context
    	http://www.springframework.org/schema/context/spring-context.xsd
    	http://www.springframework.org/schema/mvc
        http://www.springframework.org/schema/mvc/spring-mvc.xsd">
	<!-- Step 1: Add support for component scanning -->
	<context:component-scan base-package="com.getinputs" />
	<!-- Step 2: Add support for conversion, formatting and validation support -->
	<mvc:annotation-driven/>
	<!-- Step 3: Define Spring MVC view resolver -->
	<bean
		class="org.springframework.web.servlet.view.InternalResourceViewResolver">
		<property name="prefix" value="/WEB-INF/views/" />
		<property name="suffix" value=".jsp" />
	</bean>
</beans>
Request scope bean
In this bean, we will declare a counter variable and whenever a new instance of RequestScopeBean is created we will increment the counter variable by 1.
package com.getinputs;

import org.springframework.stereotype.Component;
import org.springframework.web.context.annotation.RequestScope;

@Component
@RequestScope
public class RequestScopeBean {

  static private int counter = 1;

  public RequestScopeBean() {
    counter = counter + 1;
  }

  public int getCounter() {
    return counter;
  }
}
Session scope bean
In this bean, we will declare a counter variable and whenever a new instance of SessionScopeBean is created we will increment the counter variable by 1.
package com.getinputs;

import org.springframework.stereotype.Component;
import org.springframework.web.context.annotation.SessionScope;

@Component
@SessionScope
public class SessionScopeBean {

  static private int counter = 1;

  public SessionScopeBean() {
    counter = counter + 1;
  }

  public int getCounter() {
    return counter;
  }
}
Spring MVC controller
In the controller, we will expose the endpoint. This endpoint will consume the request from the client and it will also generate the response which we will print on the view page.
package com.getinputs;

import javax.servlet.http.HttpServletRequest;
import javax.servlet.http.HttpSession;

import org.springframework.beans.factory.annotation.Autowired;
import org.springframework.stereotype.Controller;
import org.springframework.ui.Model;
import org.springframework.web.bind.annotation.RequestMapping;

@Controller
public class ScopeController {

  @Autowired
  RequestScopeBean requestScopeBean;

  @Autowired
  SessionScopeBean sessionScopeBean;

  @RequestMapping(value = "/checkScope")
  public String checkScope(Model model, HttpServletRequest request) {

    // Session will be available for 2 seconds
    HttpSession session = request.getSession();
    session.setMaxInactiveInterval(2);

    int requestCounter = requestScopeBean.getCounter();
    int sessionCounter = sessionScopeBean.getCounter();

    model.addAttribute("requestCounter", requestCounter);
    model.addAttribute("sessionCounter", sessionCounter);

    return "scopes";
  }
}
View page
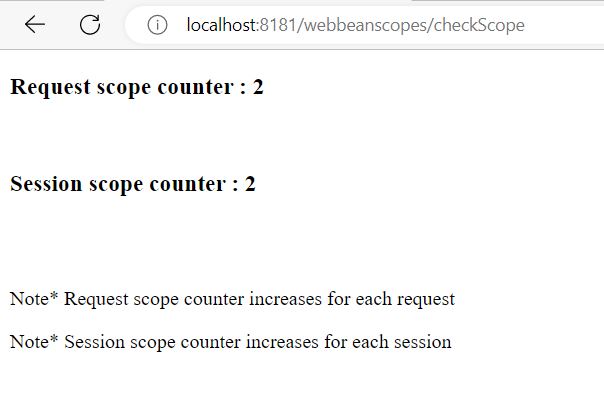
Here we will be printing the requestCounter and the sessionCounter.
<%@ page language="java" contentType="text/html; charset=UTF-8"
    pageEncoding="UTF-8"%>
<!DOCTYPE html PUBLIC "-//W3C//DTD HTML 4.01 Transitional//EN" "https://www.w3.org/TR/html4/loose.dtd">
<html>
<head>
<meta http-equiv="Content-Type" content="text/html; charset=UTF-8">
<title>User Home Page</title>
</head>
<body>
<h3>Request scope counter : ${requestCounter}</h3><br>
<h3>Session scope counter : ${sessionCounter}</h3><br>
<br>
<p>Note* Request scope counter increases for each request</p>
<p>Note* Session scope counter increases for each session</p>
</body>
</html>
Now we will build and run the application. If you want to do the local environment setup for the spring application please refer to this article https://getinputs.com/spring-environment-setup/
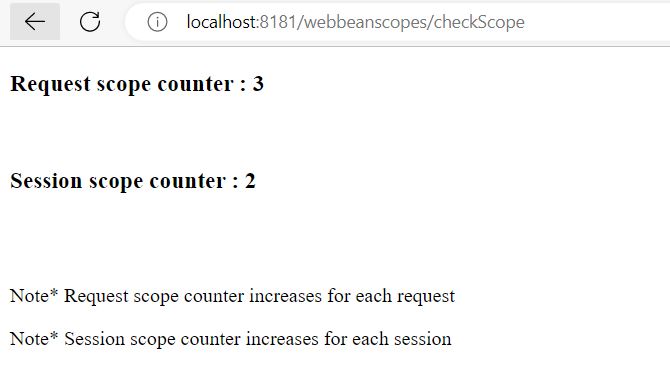
In the output, we will see as soon as we refresh the Url requestCounter increases but sessionCounter will be increased after every 2 seconds. Thus we can say the request scope bean instance is created for every HTTP request whereas the session scope bean instance gets created for every session.
Repository link
https://github.com/getinputs/samples/tree/main/webbeanscopes
So this is all about spring bean scopes. I hope you found this article interesting and valuable. If you are having any concerns or questions about this article please comment below and please share it to help me grow.