In this post, we will integrate Spring Boot with RabbitMQ and produce a message on the queue. Hence the blog heading says Spring Boot RabbitMQ producer example.
Table of contents
What is rabbit MQ?
Rabbit-MQ is an open-source message broker which helps to produce and consume messages. If you are having a large-scale enterprise application that contains multiple modules then you can make use of rabbit-MQ to communicate between them. You should have rabbit-MQ installed on your system and also you should have some knowledge of how rabbit-MQ and spring-boot work.
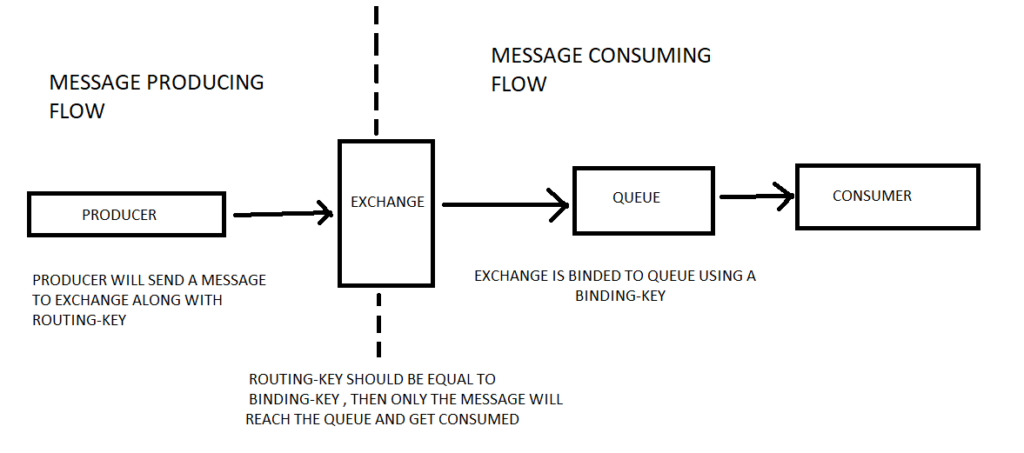
In this article, we are not focusing on produce-consume flow. We are just targeting producer flow.
Steps to create a producer application
Create Exchange, Routing Key, and Queue on Rabbit Admin UI
We will manually create an exchange on rabbit-MQ UI with the name student.exchange and a routing key named student.routing.key. Routing key cannot exist without a physical queue hence we created a physical queue named student.queue.
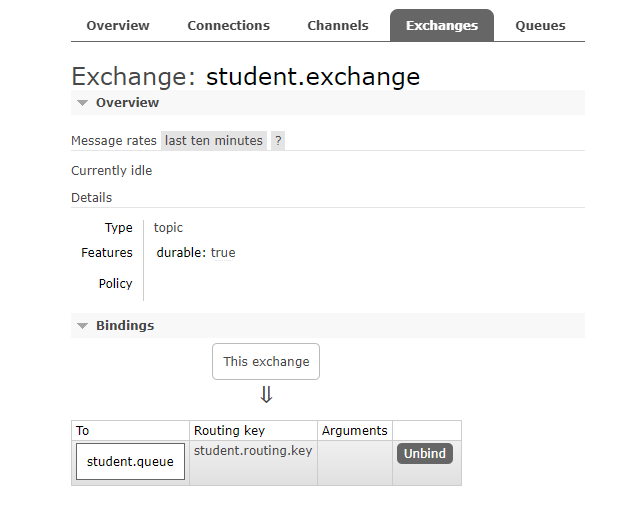
Note* From our java application whenever we are producing the message on the exchange student.exchange with a routing-key student.routing.key then the message will navigate to student.queue.
Create a spring boot application
Using the spring initializer, create a spring-boot application with the below dependencies and import it into the editor you are using.
<dependencies>
   <dependency>
      <groupId>org.springframework.boot</groupId>
      <artifactId>spring-boot-starter-amqp</artifactId>
   </dependency>
   <dependency>
      <groupId>org.springframework.boot</groupId>
      <artifactId>spring-boot-starter</artifactId>
   </dependency>
   <dependency>
      <groupId>org.springframework.boot</groupId>
      <artifactId>spring-boot-starter-web</artifactId>
   </dependency>
   <dependency>
      <groupId>org.springframework.boot</groupId>
      <artifactId>spring-boot-devtools</artifactId>
   </dependency>
<dependencies>
Create a message which we have to produce
Create a class that contains the data which is to be sent.
package com.getinputs.producer;

import org.springframework.boot.jackson.JsonComponent;

@JsonComponent
public class Student {

  int rollNumber;
  String name;

  public int getRollNumber() {
    return rollNumber;
  }
  public void setRollNumber(int rollNumber) {
    this.rollNumber = rollNumber;
  }
  public String getName() {
    return name;
  }
  public void setName(String name) {
    this.name = name;
  }
}
Note* JsonComponent is to tell the JVM that we have to convert this object to JSON.
Create a configuration class
We will create a configuration class where we can customize the RabbitTemplate class. Using this template we will be able to convert and send the message.
package com.getinputs.producer;

import org.springframework.amqp.rabbit.connection.ConnectionFactory;
import org.springframework.amqp.rabbit.core.RabbitTemplate;
import org.springframework.amqp.support.converter.Jackson2JsonMessageConverter;
import org.springframework.context.annotation.Bean;
import org.springframework.context.annotation.Configuration;

@Configuration
public class RabbitConfiguration {

  @Bean
  public RabbitTemplate rabbitTemplate(ConnectionFactory connectionFactory) {
    final RabbitTemplate rabbitTemplate = new RabbitTemplate(connectionFactory);
    rabbitTemplate.setMessageConverter(new Jackson2JsonMessageConverter());
    return rabbitTemplate;
  }
}
Create a message producer interface
We will create an interface that will have a message to produce.
package com.getinputs.producer;

public interface MessageProducerInterface<T> {
   void produce(T message);
}
Create the implementor class
Implement the MessageProducerInterface , here we will write the actual logic to produce the message over an exchange using a routing key
package com.getinputs.producer;

import org.springframework.amqp.rabbit.core.RabbitTemplate;
import org.springframework.beans.factory.annotation.Autowired;
import org.springframework.beans.factory.annotation.Qualifier;
import org.springframework.stereotype.Service;

@Service
public class MessageProducerImpl implements MessageProducerInterface < Student > {

  String exchange = "student.exchange";
  String routingKey = "student.routing.key";

  @Autowired
  @Qualifier("rabbitTemplate")
  RabbitTemplate template;

  @Override
  public void produce(Student message) {
    template.convertAndSend(exchange, routingKey, message);
  }
}
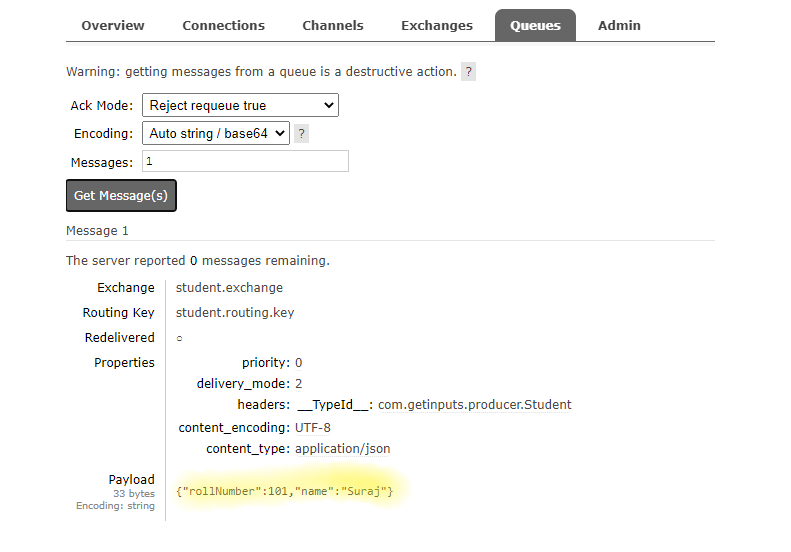
Note* Message will be produced over the student.exchange with student.routing.key
Create a controller class
Create a controller class to trigger the above service
package com.getinputs.producer;

import org.springframework.beans.factory.annotation.Autowired;
import org.springframework.web.bind.annotation.GetMapping;
import org.springframework.web.bind.annotation.RequestMapping;
import org.springframework.web.bind.annotation.RestController;

@RestController
@RequestMapping(value = "/getinputs")
public class MessageProducerController {

  @Autowired
  MessageProducerImpl messageProducerImpl;

  @GetMapping(value = "/producer")
  void produceMessage() {

    Student student = new Student();
    student.setRollNumber(101);
    student.setName("Suraj");

    messageProducerImpl.produce(student);
  }
}
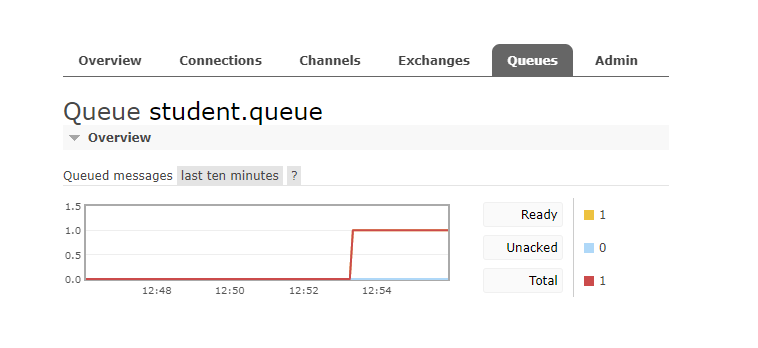
Run the application
Once the application starts trigger the URL http://localhost:8080/getinputs/producer. You will be able to find a new message in rabbit-MQ admin UI.
Hope you did like this article. If you want to add anything extra please comment below and notify me if I have gone wrong anywhere. Also, you can write to me if you want to understand any other concept.
If you want to check some different articles on the same concept please have a look at this link https://www.javainuse.com/spring/spring-boot-rabbitmq-hello-world