
In this post, we will integrate Spring Boot with RabbitMQ and consume a message from the queue. Hence the blog heading says Spring Boot RabbitMQ consumer example.
Table of contents
What is rabbit MQ?
Rabbit-MQ is an open-source message broker which helps to produce and consume messages. If you are having a large-scale enterprise application that consists of multiple modules then you can make use of Rabbit-MQ to have communication between them. You should have Rabbit-MQ installed on your system and have some basic knowledge of how Rabbit-MQ works.
In this article, we are not focussing on producer-consumer flow. We are just targetting consumer flow. If you want to check the producer flow please have a look at the producer article.
Rabbit Listener annotation
Spring AMQP framework helps us to consume the messages from the queue in a very simple way. We just have to make use of @RabbitListener annotation .
@Component
public class Consumer {
  @RabbitListener(queues = "${student.queue}")
  public void recievedMessage(Student student) {
    System.out.println("Recieved Message From RabbitMQ : " + student);
  }
}
This is a straightforward approach. we will try to understand the Consumer flow in more depth by making use of the MessageListener interface. Below are the terms which will be helpful to understand the consumer flow.
Important terms
ConnectionFactory
It provides a logical connection that helps us to have communication with the Rabbit-MQ broker.
@Bean
ConnectionFactory connectionFactory() {
   final CachingConnectionFactory connectionFactory = new CachingConnectionFactory();
   connectionFactory.setAddresses("localhost:5672");
   connectionFactory.setUsername("guest");
   connectionFactory.setPassword("guest");
   connectionFactory.setPort(5672);
   return connectionFactory;
}
Queue
It is a container to hold the messages.
@Bean
Queue studentQueue(String queueName) {
   return new Queue(queueName);
}
RabbitMQ Admin
It is an administrator that helps us to get in touch with actual Rabbit-MQ components.
- Create a RabbitAdmin instance using the ConnectionFactory.
- RabbitAdmin instance will help us to declare Queue object and declare Binding.
@Bean
AmqpAdmin amqpAdmin() {
   return new RabbitAdmin(connectionFactory());
}

@Bean
Queue studentQueue() {
   Queue queue = studentQueue(queueName);
   amqpAdmin().declareQueue(queue);
   amqpAdmin().declareBinding(BindingBuilder.bind(queue).to(studentExchange()).with(bindingKey));

   return queue;
}
Note* Queue is bound to an Exchange using a binding key
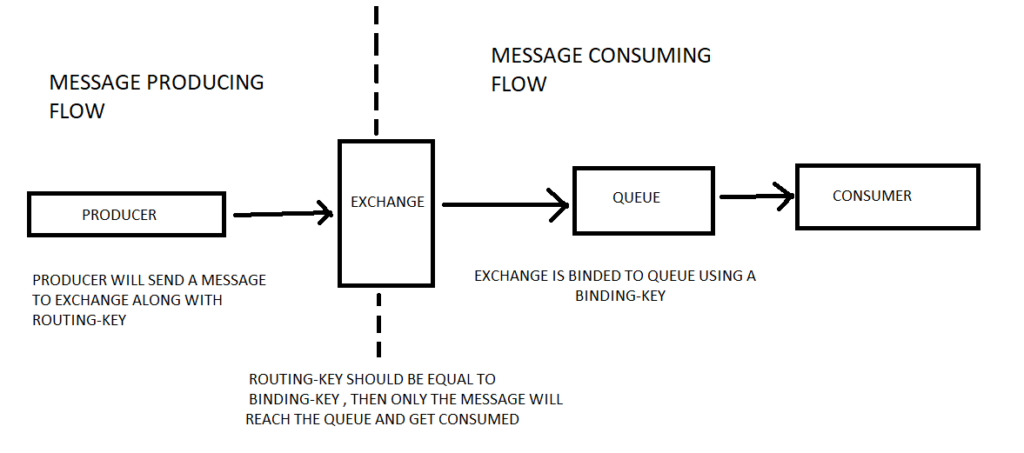
Exchanges
It helps to route the message to a Queue.
- Produced message along with Exchange name and routing key will help the message reach the exact destination ( Queue ).
- routing key should be equal to the binding key.
- Queue is bound to an Exchange using a binding key.
@Bean
TopicExchange studentExchange() {
   TopicExchange exchange = new TopicExchange(exchangeName);
   amqpAdmin().declareExchange(exchange);
   return exchange;
}
SimpleMessageListenerContainer
It helps the message consumer to listen to a particular queue and consume the message if it is available.
- Create a SimpleMessageListenerContainer instance using the connectionFactory .
- SimpleMessageListenerContainer instance will help us to set the Queue and message listener for a consumer.
@Bean
SimpleMessageListenerContainer messageListener() {
   SimpleMessageListenerContainer container = new    SimpleMessageListenerContainer(connectionFactory());
   container.setQueues(messageConsumer().getQueue());
   container.setMessageListener(new MessageListenerAdapter(messageConsumer()));
   return container;
}

@Bean
MessageConsumer messageConsumer() {
   return new MessageConsumer(studentQueue());
}
Steps to create a Sample Consumer application
In the Message producer flow, we have created an exchange and a Queue. We also bound the Queue to Exchange using a binding key. We were successfully able to see the spike in the Queue which meant a message was properly produced on the Queue.
Create a Spring boot application
Using the spring initializer, create a spring-boot application with the below dependencies and import it in the editor you are making use of.
<dependencies>
  <dependency>
     <groupId>org.springframework.boot</groupId>
     <artifactId>spring-boot-starter-amqp</artifactId>
  </dependency>
  <dependency>
     <groupId>org.springframework.boot</groupId>
     <artifactId>spring-boot-starter</artifactId>
  </dependency>
  <dependency>
     <groupId>org.springframework.boot</groupId>
     <artifactId>spring-boot-starter-web</artifactId>
  </dependency>
  <dependency>
     <groupId>org.springframework.boot</groupId>
     <artifactId>spring-boot-devtools</artifactId>
  </dependency>
<dependencies>
Configuration class
Create a configuration class, which defines all the components which are explained above.
package com.getinputs.consumer;

import org.springframework.amqp.core.AmqpAdmin;
import org.springframework.amqp.core.BindingBuilder;
import org.springframework.amqp.core.Queue;
import org.springframework.amqp.core.TopicExchange;
import org.springframework.amqp.rabbit.connection.CachingConnectionFactory;
import org.springframework.amqp.rabbit.connection.ConnectionFactory;
import org.springframework.amqp.rabbit.core.RabbitAdmin;
import org.springframework.amqp.rabbit.listener.SimpleMessageListenerContainer;
import org.springframework.amqp.rabbit.listener.adapter.MessageListenerAdapter;
import org.springframework.context.annotation.Bean;
import org.springframework.context.annotation.Configuration;

@Configuration
public class RabbitConfiguration {
  String queueName = "student.queue";
  String exchangeName = "student.exchange";
  String bindingKey = "student.routing.key";

  @Bean
  MessageConsumer messageConsumer() {
    return new MessageConsumer(studentQueue());
  }

  @Bean
  Queue studentQueue() {
    Queue queue = studentQueue(queueName);
    amqpAdmin().declareQueue(queue);
    amqpAdmin().declareBinding(BindingBuilder.bind(queue).to(studentExchange()).with(bindingKey));

    return queue;
  }

  @Bean
  Queue studentQueue(String queueName) {
    return new Queue(queueName);
  }

  @Bean
  AmqpAdmin amqpAdmin() {
    return new RabbitAdmin(connectionFactory());
  }

  @Bean
  ConnectionFactory connectionFactory() {
    final CachingConnectionFactory connectionFactory = new CachingConnectionFactory();
    connectionFactory.setAddresses("localhost:5672");
    connectionFactory.setUsername("guest");
    connectionFactory.setPassword("guest");
    connectionFactory.setPort(5672);
    return connectionFactory;
  }

  @Bean
  TopicExchange studentExchange() {
    TopicExchange exchange = new TopicExchange(exchangeName);
    amqpAdmin().declareExchange(exchange);
    return exchange;
  }

  @Bean
  SimpleMessageListenerContainer messageListener() {
    SimpleMessageListenerContainer container = new SimpleMessageListenerContainer(connectionFactory());
    container.setQueues(messageConsumer().getQueue());
    container.setMessageListener(new MessageListenerAdapter(messageConsumer()));
    return container;
  }
}
Consumer class
Create a message consumer class that consumes the message produced on “student.queue”
package com.getinputs.consumer;

import org.springframework.amqp.core.Message;
import org.springframework.amqp.core.MessageListener;
import org.springframework.amqp.core.Queue;

public class MessageConsumer implements MessageListener {

  Queue queue;

  public MessageConsumer(Queue queue) {
    this.queue = queue;
  }

  Queue getQueue() {
    return queue;
  }

  @Override
  public void onMessage(Message message) {
    System.out.println("Message consumed is : " + message);
  }
}
Executing application
Once the application starts consumer will consume the message from the “student.queue”.
Output : Message consumed is : (Body:'{"rollNumber":101,"name":"Suraj"}' MessageProperties [headers={__TypeId__=com.getinputs.producer.Student}, contentType=application/json, contentEncoding=UTF-8, contentLength=0, receivedDeliveryMode=PERSISTENT, priority=0, redelivered=true, receivedExchange=student.exchange, receivedRoutingKey=student.routing.key, deliveryTag=1, consumerTag=amq.ctag-gItUFvNK4USnPE3O_rE8wA, consumerQueue=student.queue])

This is all about Messaging consumers using Spring-Boot and Rabbit-MQ. Hope you did like this article. If you want to add anything extra please comment below and notify me if I have gone wrong anywhere. Also, you can write to me if you want to understand any other concept.
If you want to check some different articles on the same concept please have a look at this link https://www.javainuse.com/spring/spring-boot-rabbitmq-consume