
Table of contents
Spring boot
Spring Boot is a framework that is used to create standalone and web-based applications very easily.
- It provides easier way to configure and set-up spring based applications.
- Spring boot provides embedded server by default.
- Spring boot makes the integration with other frameworks like Hibernate etc easy.
- It provides auto configuration. Ex. If H2 database jar is supplied in the application classpath then h2 in-memory database gets configured automatically without any manual intervention.
H2 Database
- It is a open source relational database.
- It is a in-memory database which means the data will not be saved on disk.
- H2 database can be easily embedded in java applications.
- It is extremely fast as it is a in-memory database.
- H2 database can be accessed using a web-browser.
Brief overview on application
- We will create a spring-boot sample application with h2 as an in-memory database.
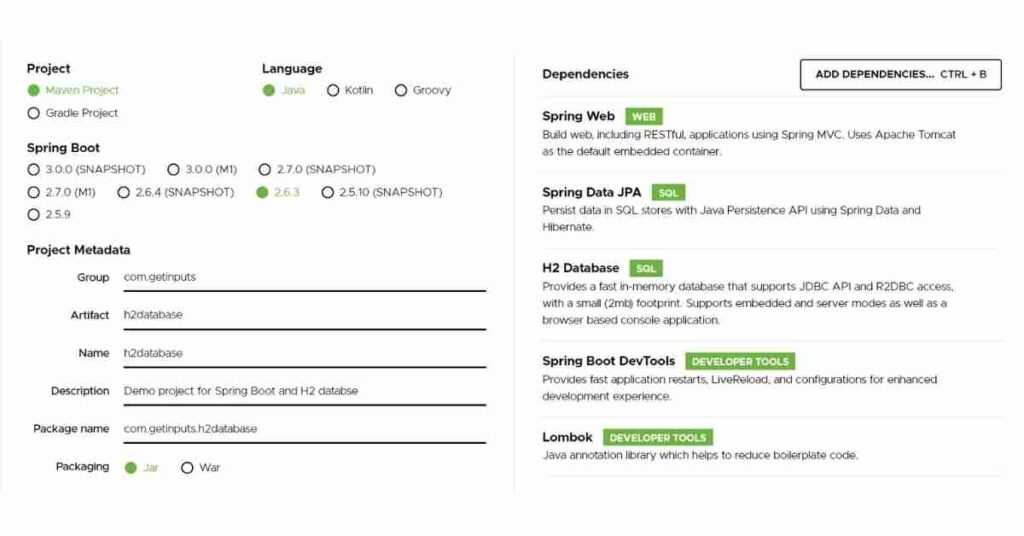
- Using the spring initializr we will create an application with dependencies like WEB, JPA, H2 DATABASE, DEVTOOLS, LOMBAK.
- We will create Employee and Manager classes and we will save the fields of both these classes in the h2 database.
- Employee class will have 3 fields: id, name, and salary.
- Manager class will have 2 fields: id, and name.
- We will create a EmployeeController class with saveEmployeeAndManager method. This method saves both employee and manager details in the h2 database.
- We will create a ManagerController class with saveManager method. This method saves manager details in the h2 database.
Creating application
Create an application using spring initializr as below and we will import the application to our favorite editor. A parent SpringBootApplication class gets created by default when the application is created.
Project Structure
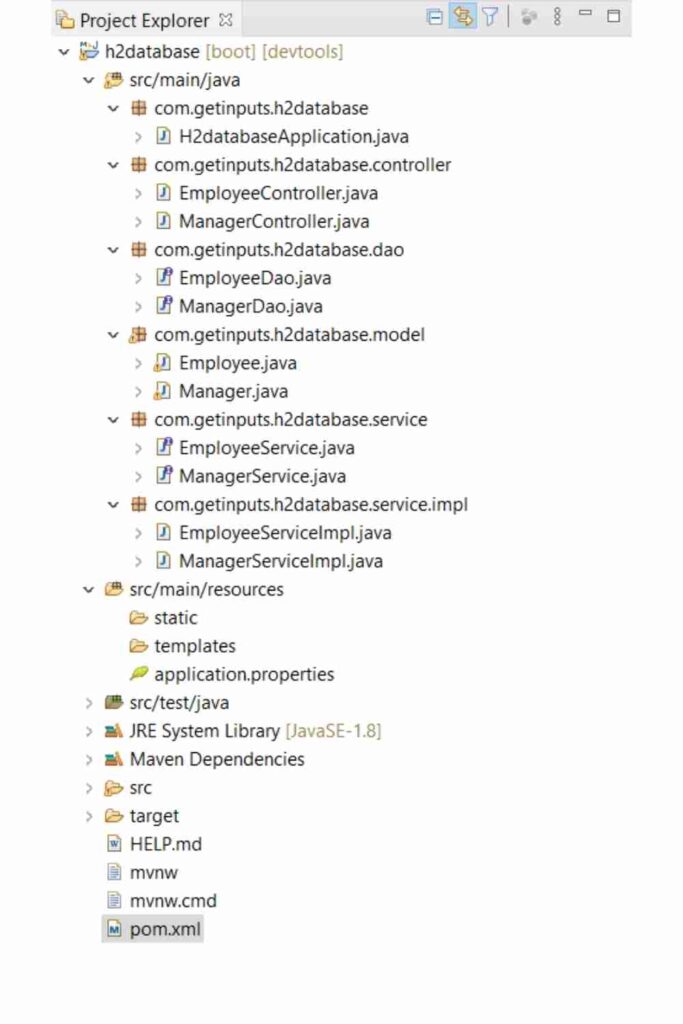
Below is the project structure of our application. We will create the below files step by step.
Main class
H2databaseApplication.java

package com.getinputs.h2database;

import org.springframework.boot.SpringApplication;
import org.springframework.boot.autoconfigure.SpringBootApplication;

@SpringBootApplication
public class H2databaseApplication {

  public static void main(String[] args) {
    SpringApplication.run(H2databaseApplication.class, args);
  }
}
Generated pom file
This is a file where all the dependencies are available. As we have made use of WEB, JPA, H2 DATABASE, DEVTOOLS, and LOMBAK dependencies hence we will find all those dependencies in this pom file.
Lombak: It is a java library that helps to reduce or completely remove the boilerplate code. We have to make use of some annotations instead of the code.
Ex: @Data annotation is used as a shortcut for @ToString, @EqualsAndHashCode, @Getter on all fields, @Setter on all non-final fields, and @RequiredArgsConstructor hence we don’t have to specify either of getters or setters methods explicitly.
Create Model classes
The Employee is a model class that specifies the properties of the Employee. We will save all the properties of the Employee in the h2 database.
package com.getinputs.h2database.model;

import javax.persistence.Entity;
import javax.persistence.GeneratedValue;
import javax.persistence.GenerationType;
import javax.persistence.Id;

import lombok.AllArgsConstructor;
import lombok.Data;
import lombok.NoArgsConstructor;

@Entity
@Data
@AllArgsConstructor
@NoArgsConstructor
public class Employee {

  @Id
  @GeneratedValue(strategy = GenerationType.AUTO)
  private int id;

  private String name;
  private int salary;

  public Employee(String name, Integer salary) {
    this.name = name;
    this.salary = salary;
  }
}
The manager is a model class that specifies the properties of the Manager. We will save all the properties of the Manager in the h2 database.
package com.getinputs.h2database.model;

import javax.persistence.Entity;
import javax.persistence.GeneratedValue;
import javax.persistence.GenerationType;
import javax.persistence.Id;

import lombok.AllArgsConstructor;
import lombok.Data;
import lombok.NoArgsConstructor;

@Entity
@Data
@AllArgsConstructor
@NoArgsConstructor
public class Manager {

  @Id
  @GeneratedValue(strategy = GenerationType.AUTO)
  private int id;

  private String name;

  public Manager(String name) {
    this.name = name;
  }
}
Create DAO Classes
This DAO class helps to store the Employee and Manager details in H2 Database.
EmployeeDao.java

package com.getinputs.h2database.dao;

import org.springframework.data.jpa.repository.JpaRepository;
import com.getinputs.h2database.model.Employee;

public interface EmployeeDao extends JpaRepository<Employee, Integer> {
}
ManagerDao.java

package com.getinputs.h2database.dao;

import org.springframework.data.jpa.repository.JpaRepository;

import com.getinputs.h2database.model.Manager;

public interface ManagerDao extends JpaRepository<Manager, Integer> {
}
JpaRepository is a java persistence API-specific extension of Repository which contains the methods to perform CRUD operations.
Create Service Classes
This service class acts as a business layer between the Controller and DAO classes.
EmployeeService.java

package com.getinputs.h2database.service;

public interface EmployeeService {
  String saveEmployeeAndManager();
}
EmployeeServiceImpl.java

package com.getinputs.h2database.service.impl;

import org.springframework.beans.factory.annotation.Autowired;
import org.springframework.stereotype.Service;

import com.getinputs.h2database.dao.EmployeeDao;
import com.getinputs.h2database.model.Employee;
import com.getinputs.h2database.service.ManagerService;
import com.getinputs.h2database.service.EmployeeService;

@Service
public class EmployeeServiceImpl implements EmployeeService {

  @Autowired
  private EmployeeDao employeeDao;

  @Autowired
  private ManagerService managerService;

  @Override
  public String saveEmployeeAndManager() {

    String response = "Employee and Manager Saved.";

    Employee employee = new Employee("Surya", 50000);
    employeeDao.save(employee);

    managerService.saveManager();

    return response;
  }
}
EmployeeServiceImpl class makes a call to EmployeeDao class to save the Employee object. Also, it makes a call to ManagerService class which internally saves the Manager object. Hence we can say EmployeeServiceImpl saves both the Employee and Manager object in H2 Database.
ManagerService.java

package com.getinputs.h2database.service;

public interface ManagerService {
  String saveManager();
}
ManagerServiceImpl.java

package com.getinputs.h2database.service.impl;

import org.springframework.beans.factory.annotation.Autowired;
import org.springframework.stereotype.Service;

import com.getinputs.h2database.dao.ManagerDao;
import com.getinputs.h2database.model.Manager;
import com.getinputs.h2database.service.ManagerService;

@Service
public class ManagerServiceImpl implements ManagerService {

  @Autowired
  private ManagerDao managerDao;

  @Override
  public String saveManager() {

    String response = "Manager Saved";

    Manager manager = new Manager("Suraj");
    managerDao.save(manager);

    System.out.println(response);
    return response;
  }
}
ManagerServiceImpl class makes a call to ManagerDao class to save the Manager object.
Create Controller classes
These controller classes catch the request coming from the web browser and process those requests by making subsequent calls to appropriate service classes.
EmployeeController.java

package com.getinputs.h2database.controller;

import org.springframework.beans.factory.annotation.Autowired;
import org.springframework.web.bind.annotation.GetMapping;
import org.springframework.web.bind.annotation.RequestMapping;
import org.springframework.web.bind.annotation.RestController;

import com.getinputs.h2database.service.EmployeeService;

@RestController
@RequestMapping("/employee")
public class EmployeeController {

  @Autowired
  private EmployeeService employeeService;

  @GetMapping
  public String saveEmployeeAndManager() {
    return employeeService.saveEmployeeAndManager();
  }
}
As soon as we trigger a web request with /employee Url, EmployeeController catches the request and saves the Employee and Manager data in H2 Database.
package com.getinputs.h2database.controller;

import org.springframework.beans.factory.annotation.Autowired;
import org.springframework.web.bind.annotation.GetMapping;
import org.springframework.web.bind.annotation.RequestMapping;
import org.springframework.web.bind.annotation.RestController;

import com.getinputs.h2database.service.ManagerService;

@RestController
@RequestMapping("/manager")
public class ManagerController {

  @Autowired
  private ManagerService managerService;

  @GetMapping
  public String saveManager() {
    return managerService.saveManager();
  }
}
As soon as we trigger a web request with /manager Url, ManagerController catches the request and saves the Manager data in H2 Database.
Connectivity details
As we have added the H2 Database to the classpath hence by the spring-boot autoconfiguration feature H2 is available for this application. But we have to specify the connection details in the properties file.
application.properties

# DB Properties
spring.datasource.url=jdbc:h2:mem:testdb
spring.datasource.driverClassName=org.h2.Driver
spring.datasource.username=sa
spring.datasource.password=
spring.jpa.database-platform=org.hibernate.dialect.H2Dialect
Compile the application
We can build the above application from within the editor or by using the maven command.
mvn clean install -DskipTests
This command cleans the existing target folder, compiles and installs the created jar to local .m2 repository
Run the application
We can run the above application from within the editor or by using the maven command.
mvn spring-boot:run
This command runs a spring boot application
Once the application is Up we can see the below logs :
… Tomcat initialized with port(s): 8080 (http)
… H2 console available at ‘/h2-console’. Database available at ‘jdbc:h2:mem:testdb’
… Tomcat started on port(s): 8080 (http) with context path ”
Now we can access H2 Console and trigger the Rest URLs.
Accessing H2 Console
We can access the H2 Console from the web browser. Trigger Url: http://localhost:8080/h2-console

Once we connect, we can see there are 2 tables created as we have made use of JPA. EMPLOYEE and MANAGER are the 2 tables created and they are empty.

Trigger Rest Urls
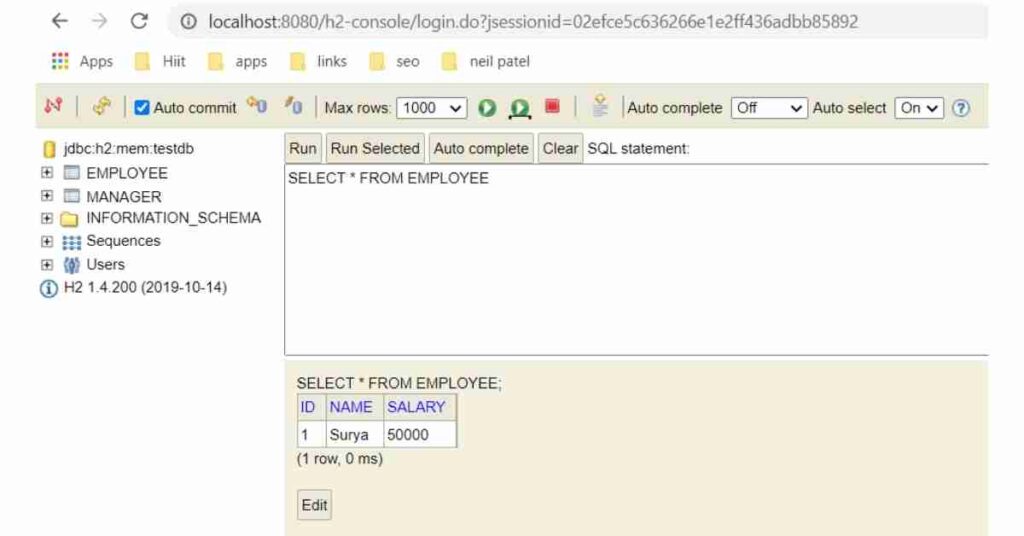
http://localhost:8080/employee
O/P : Employee and Manager Saved.
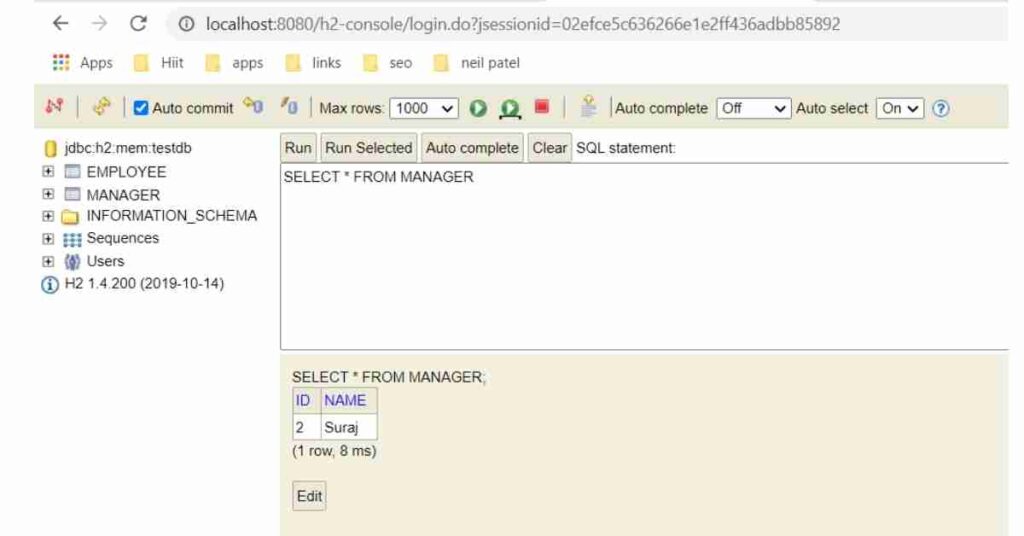
http://localhost:8080/manager
O/P : Manager Saved

I hope you found this article interesting and valuable. Please share this article with your friends and help me grow. If you are having any concerns or questions about this article please comment below. If you want to get in touch with me please visit the Contact Me page and send me an email.
GitHub repository link
You can find the above project here:
https://github.com/getinputs/samples/tree/main/h2database